
Thanks for this instructive presentation. By reading this allocation I've gained quite handy lessons about the darkroom wall mounting enlargers, and such lessons will be helpful to fit any wall mount in my home.
tv installation
- REVIEWS
Camera Reviews 
More Reviews Mobile Reviews Photography Reviews - GALLERIES
- VIDEOS
- BUYER'S GUIDES
The Darkroom
Wall Mounting Enlargers
|
If you have a medium format
or a 35mm format enlarger, then you probably do not need to wall mount
your enlarger. However, if you have a 4x5 enlarger, you might want to
consider the benefits of wall mounting. Wall Mounting Tips |
- Log in or register to post comments

Thanks for this instructive
Submitted by polmarhollan on December 19, 2012 - 11:47pm
Great information
Submitted by multimediatech on March 15, 2016 - 3:12am
darkroom wall mounting enlargers are very helpful. Very informative article, thanks.
http://mymultimediatech.com/tv-installation/
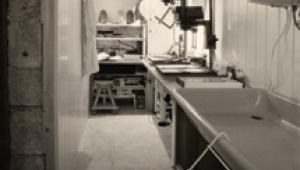


PHOTO OF THE DAY

Today’s photo is Breakaway by Jeff Van Scoyk
eNEWSLETTER SIGNUP
![]()
Get the Latest Photo Tips, News & Reviews from Shutterbug!
| Camera Reviews Other Reviews | Mobile Reviews Photography Reviews Columns | News | Features | How-To | Resources |
 © 2024 Shutterbug
AVTech Media Americas Inc., USA
All rights reserved