- REVIEWS
Camera Reviews 
More Reviews Mobile Reviews Photography Reviews - GALLERIES
- VIDEOS
- BUYER'S GUIDES
Create A High Tech Pixelated Effect
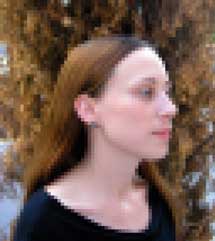
1. Open the photo you want to pixelate and make a copy of it, Image>Duplicate. Close the original and work on the copy. I photographed Jessica, #1, outdoors under soft overcast light with a Canon Digital Rebel and a Canon 18-55mm lens at 55mm (equivalent to 88mm in 35mm format terms).
 |
|
|
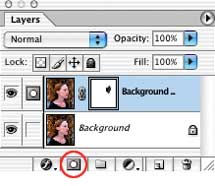
2. Go to the Layers palette and make a copy of the background layer by dragging it to the New Layer icon just to the left of the trashcan at the bottom of the Layers palette, circled in red here, #2. (In Elements, the New Layer icon is at the top of the palette.) We're going to pixelate the entire copy layer, then remove part of it so that some normal areas from the original background image show through.
 |
|
|
3. With the copy layer (layer 1) selected (highlighted) in the layers palette, choose Filter>Pixelate>Mosaic to bring up this dialog box, #3. Make sure the Preview box is checked, and that the size of the preview in the dialog box is set to 100 percent. Use the cell size slider to set the size of pixels you want, then click OK.
 |
|
|
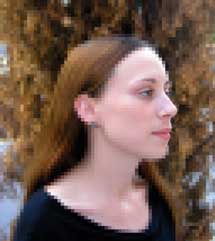
4. You'll see this pixelated effect applied to the entire top layer, #4. What looks best will vary with the size and resolution of your image, as well as how dramatic you want the effect to be. I used a cell size of 30 for this 11-megabyte file at 300dpi. Keep in mind what size the image will ultimately be seen in, either as a print or onscreen. Usually, you want the pixelated parts of the image to show some detail. If the cell size is too small, the viewer won't see much of the pixelated effect. But if the cell size is too large, you may just see abstract blobs. Find a cell size that clearly shows pixelation, but also retains some of the tones and detail of the original photo.
 |
|
|
5. Now is when it gets interesting. We will digitally hide parts of the pixelated top layer, Layer 1, so that some of the normal original background photo shows through. In Photoshop, click on the New Layer Mask icon at the bottom of the layers palette, #5. This is a small grey rectangle with a white circle in the middle, second from the left, circled in red here. Press the letter "d" on the keyboard to insure that the foreground and background colors are set to their defaults, then press the letter "b" to select the brush tool. In the options bar across the top of the screen, set the opacity to 60 or 70 percent.
 |
|
|
Now, with a soft edged, medium sized brush, paint on the image where you want
the clear original photo to show through. (For those who want to know, you'll
be painting with black on the layer mask).
In these examples, I first brushed carefully around only the eye, #6. Brush
several times over areas that you want to fully show through, but leave the
transition edges soft for a gradual fade between the normal and pixelated areas.
If you go too far or reveal an area that you want to remain pixelated, simply
click the letter "x" on your keyboard to exchange the foreground
and background colors. Now you'll be painting on the mask with white which
will bring back the pixelated top layer. Press "x" again to reveal
the background photo with your brushstrokes.
 |
|
|
For Elements users, since layer masks are not available, you'll need to use the Eraser tool on layer 1 to erase parts of the pixelated top layer and allow the normal bottom (background) layer to show through.
6. Brushing only around the eye created this somewhat eerie effect, #6.
7. For the final image, #7, I first brushed carefully around the eye, then brushed over the nose and lips as well. Note how the image contrasts the realistic rendering of the woman's elegant features and the fine detail of her eyes with the high tech, futuristic, digital-industrial look of the enlarged pixels of her hair and the background.
 |
|
|
For a more complex effect, try combining several different degrees of pixelation,
by using different cell sizes in the Mosaic filter on more copy layers.
Contact
Adobe Systems Inc.
(800) 833-6687
www.adobe.com
- Log in or register to post comments


![]()
Get the Latest Photo Tips, News & Reviews from Shutterbug!
| Camera Reviews Other Reviews | Mobile Reviews Photography Reviews Columns | News | Features | How-To | Resources |
 © 2024 Shutterbug
AVTech Media Americas Inc., USA
All rights reserved