- REVIEWS
Camera Reviews 
More Reviews Mobile Reviews Photography Reviews - GALLERIES
- VIDEOS
- BUYER'S GUIDES
Off-Camera Lighting
Take It Off The Hot Shoe For Best Results Page 2
Maintaining Sync
The first task in getting your flash off-the-camera is to figure out
how to sync the flash with the camera. Most shoe mount electronic flash units
do not have any additional sync connections, so the simple and cost-effective
way to hook them up is to purchase a small accessory hot shoe. This will give
you a basic PC sync connection, and you can sync that to your camera body. It's
easy and it works.
 |
 |
||
|
|
Of course, all of you modern SLR
owners will want to know, "How do I hook up my TTL flash unit?"
I own Canon EOS cameras, and my 550EX flash units can create a fairly elaborate
automatic flash system. By simply adding a Canon ST-E2 Speedlite transmitter,
I can sync up my flash unit with the camera, and have completely
automatic functionality.
Can it get any easier? Nikon offers a similar unit for use with Nikon flashes,
and of course there is the wonderful Quantum FreeWire system, which combines
a radio remote system with dedicated modules for most popular TTL flash systems.
To be perfectly honest, while I do own a Canon ST-E2 transmitter and compatible flash unit, I almost never use this in tandem for off-camera flash. Call me a creature of habit, but I have found far better results using a flash unit on manual, tweaking the camera settings as I go. Certainly digital imaging has helped me with this ultimate manual exposure system, since I can monitor the LCD display on the rear of the camera as I go and see my exposure. In the old days you had to pray for correct exposure and deal with the bad shots the best you could. Now with on-the-fly "Polaroids" of every shot, you've got a lot better idea of what your flash is doing.
The Radio Way
Besides a basic sync cord and the fancier dedicated systems, you can still hook
up a hot shoe flash to the camera by using an optical or radio slave system.
Wein makes a terrific package for getting this done, and I'm a big fan
of the PocketWizard Plus system. The advantage of a wireless system is that
you cannot only get the flash off-camera, but you can get it a good distance
away from the camera location. I've often placed my main flash on top
of a bookcase, over a doorway, inside a lampshade--all areas where cords
wouldn't work.
For simply placing a flash in a location and then working independently, I like
a small Bogen mini tripod with a ball head. It's small enough that I can
keep it in the bag at all times, and sturdy enough to hold the flash head at
any angle. Another great tool is the Bogen Super Clamp, which is the "bolt
the flash to the doorframe" champ. They're cheap and last forever.
 |
 |
||
|
|
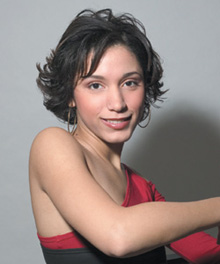
Lighting Setup
Once you figure out how to get the flash away from the camera, it's time
to figure out how to light things. Obviously, once the light source is away
from the axis of the lens, you totally remove problems like redeye and direct
reflections from mirrors and windows. There are still an awful lot of ways to
throw your light on the subject: direct, diffused, and via bouncing. Call me
crazy, but I like the look of a direct flash held about 2 ft away from the lens,
on either side of the camera. There's something about the super-direct
quality of a small handheld flash that gives things a certain sparkle, and once
I can get rid of the hard shadows that fall directly under the subject's
nose and chin, I can create shadows that can be actually flattering to the subject.
In the studio I often use a focusing spotlight unit to get a more elaborate
version of this effect, but I've proven that harsh light can be flattering--as
long as the direction of the light is right.
For softer lighting, there are any number of on-flash diffusers that will take
the edge off your light. I say "edge" because there's no way
a 5 or 6" diffuser will produce very soft light at 10 or 12 ft. To create
softness for a waist-up portrait you'll need a larger softbox or umbrella,
both of which are particularly impractical solutions. For big, soft, very sexy
lighting I like regular old cardboard. Yes, I love to shoot off a regular old
piece of white foamcore or poster board. A light stand works fine to hold the
board but I've done plenty of "grin and grab" portraits by
taping a white poster to a wall and bouncing my flash off the white surface
(or turning my assistant into a human light stand, which gets old very fast).
By arranging both the camera position and the position of my subject I can get
very soft and nice lighting.
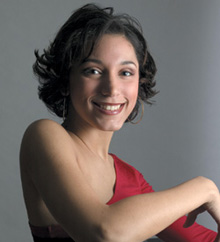
The Classic Bounce
Bouncing off of existing walls and the ceiling can be very effective also. You'd
be amazed at how you can vary the quality of light by bouncing off different
parts of a room. I'll often shoot a series of shots with the flash bounced
off various points along the ceiling--and I usually try to spill just a
touch of light back to the subject for a little sparkle in the eyes and to remove
the deep bags under the eyes. These are all things that are very tough to do
when the flash is in the hot shoe.
 |
|
|
Slave Mimics
Another really great way to handle your lighting is to sync your flash up wirelessly
and use that light to mimic the existing lighting. For years I've traveled
with a box full of older Soligor MK-10A flash units sitting on Wein HS-XL hot
shoe slave units. (Photo shows are great places to find older, perfectly good,
strobes for a few bucks each!) I'll enter a room that I'll be shooting
in a bit early and gaffer-tape a unit inside every lampshade, on top of bookcases,
and behind doors. My goal is to use the relatively modest output of the MK-10As
to add just a bit of light that will seem like ambient lighting. With only 60
ws they complement the power of my main portables nicely, and I've been
able to really keep the feel of the room this way. For simple home portraits
I love to throw a slave flash inside a lampshade and use another off-camera
flash for my main portrait lighting. With modern high-capacity Ni-MH batteries
these old workhorses can go for 100 shots or so on manual before croaking.
If you're serious about creating great lighting wherever you go, a very
small amount of effort will reward you with really dynamic flash pictures. If
you get really serious about this I would recommend a Lumedyne or Norman battery-powered
flash system. There's nothing like speed, power, and performance to assist
your creativity. That said, I've made some very compelling images with
nothing more than an SLR, normal lens, and a single Vivitar flash on a 12 foot
sync cable. The first step is breaking the bond between your flash and the hot
shoe, and as with all new techniques, shoot a lot and learn from your mistakes!
|
| |||||||||
- Log in or register to post comments


![]()
Get the Latest Photo Tips, News & Reviews from Shutterbug!
| Camera Reviews Other Reviews | Mobile Reviews Photography Reviews Columns | News | Features | How-To | Resources |
 © 2024 Shutterbug
AVTech Media Americas Inc., USA
All rights reserved