- REVIEWS
Camera Reviews 
More Reviews Mobile Reviews Photography Reviews - GALLERIES
- VIDEOS
- BUYER'S GUIDES
Build Your Own Custom Imaging Computer
It Is Easier Than You Think
Don't worry; you will
not need a soldering iron to build your own computer. In fact all you
need is a Phillips screwdriver and maybe a pair of needle nose pliers.
But then, why would anyone build their own computer when you can buy one
in a store for $500? Good question. |
|||
If you have any technical aptitude it's really quite rewarding to build your own computer. What's more you can build the exact computer for your needs. Okay, you might not save much money but you will end up with a better computer. How come? After all, if you tried to build your own car or refrigerator you'd end up with something not nearly as good as buying one off-the-shelf. The secret is that apart from laptops and Apple Macintosh computers, few of the other PCs on the market are built using exclusively proprietary parts. Instead, all the components of a modern computer can be purchased off-the-shelf and it takes nothing more than a screwdriver and some dexterity to assemble one's own computer. About the most difficult part of building your own computer is installing a hard drive. In fact, if you have already installed a hard drive in a PC you're ready for the next step--building a complete system from scratch. A Dozen Components |
|||
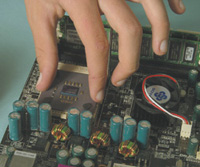
A key component is the motherboard. This is the soul of the computer. But without a doubt the heart of a computer is the CPU (Central Processing Unit). It's a good place to start. Basically there are two choices of manufacturer for a CPU in a PC--Intel or AMD. (Apple uses an entirely different CPU). Intel and AMD CPUs are all but identical from the end-user's point of view. On the whole you're more likely to find AMD CPUs sold through the Internet and in retail stores and they are generally less costly than Intel CPUs. CPU Speed |
|||
The Motherboard |
|||
Motherboards are made by a
wide variety of manufacturers including Intel, which is the only household
name recognized outside of the computer world. There are numerous web
sites that carry reviews on motherboards from all companies. In the ever-changing
computer world new ones are coming to market literally every week, so
it is hard to keep up, just as it is for the average consumer in the world
of cars! |
|||
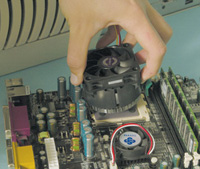
Assembly |
|||
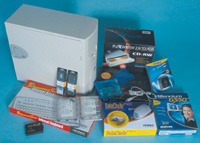
Step By Step Switch It On XP Facility Adding Extra Cards Complete Components Extras Cost of this DIY computer without a monitor or the extra cards is approximately $1000, while a similarly equipped computer would cost between $900 and $1400 from a mail-order company such as Dell or Gateway. The nearest equivalent Apple Macintosh would cost about $1500. Resources Books Video |


- Log in or register to post comments


![]()
Get the Latest Photo Tips, News & Reviews from Shutterbug!
| Camera Reviews Other Reviews | Mobile Reviews Photography Reviews Columns | News | Features | How-To | Resources |
 © 2024 Shutterbug
AVTech Media Americas Inc., USA
All rights reserved