- REVIEWS
Camera Reviews 
More Reviews Mobile Reviews Photography Reviews - GALLERIES
- VIDEOS
- BUYER'S GUIDES
Adobe’s Photoshop CS4; Features For Photographers
 Now on Version 11, it’s hard to imagine that Photoshop can continue to make large changes. It seems that just about everything but the kitchen sink is already in the application, but once again Adobe has found ways to take a mature application and improve it. In this overview, I’ll give you a first look at the new features you’ll find in CS4.
First up, and a Windows-only feature, is support for very large files thanks to running in 64 bit (with a 64-bit version of Windows) (#1). Mac users will have to wait for a future release for 64-bit power. CS4 also supports 3D acceleration via OpenGL compatible graphics cards for faster performance with 3D operations.
 |
|
|
User Interface Changes
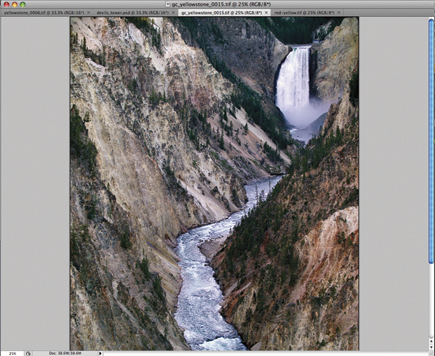
CS4 has changed the main work area and now supports tabbed documents (#2). Here you can see the major changes to the user interface. The main toolbar across the top of the window has changed with many of the most common tools, like Selection, Zoom, Rotate, and View placed on the title bar for immediate access.
 |
|
|
You can also choose to float one or more windows if you want to view images in the CS3 and earlier style, or compare images. The panel area has also changed and includes new quick access for common actions (#3). Panels can be viewed in a docked manner or floating as before, but the small sidebar with History, Settings, Type, and Layer Comps is gone. You’ll now access these via the Window menu, or if you use them frequently, you can add them to the dock.
 |
|
|
Masks & Adjustments Panels
One of the big changes is the Masks and Adjustments panels. The Mask panel gives you quick access to common masking tools for both pixel- and vector-based masks.
You can adjust density and feathering and select non-contiguous objects (#4).
 |
|
|
The Adjustments panel moves many of the items formally accessed through Image>Adjustments into an easy-to-use panel (#5). Along with tools like Curves, Levels, Hue & Saturation, you also have presets. Choosing any of the options here adds an adjustment layer to your image with the appropriate control selected in the panel. Adjustments can be applied to the current layer or all layers below it. You can add new presets that will appear in the panel for future use.
 |
|
|
Rotating, Panning, Zooming
If you use a graphics tablet, you’re going to love this next feature. You can now rotate your canvas to any desired angle, making the use of a pen much easier when doing edits to your images (#6). The rotate is nondestructive and very responsive, even with large files.
 |
|
|
Panning and zooming has been enhanced with smoother control over panning—you can now “flick” your images—click with the Hand tool and push the document (this requires OpenGL). It will scroll automatically based on how aggressive the gesture is. Zooming has added a Pixel Grid to enable accurate editing at any magnification (#7).
 |
|
|
Compositing
Auto-Align has been enhanced, and the Spherical Alignment mode lets you create 360? panoramas. Auto-Blend smoothly blends color and shading and depth of field correction with both vignette and lens distortion controls has been improved over the previous version.
 |
|
|
Auto Blending And Aligning
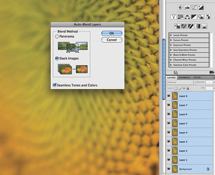
Auto-Blend lets you take a number of images, each at different focus points, and merge them together to create a single image with greater depth of field. In the example shown here (#8a), I’ve used eight different images to capture the entire sunflower into focus. Adding each additional image as a layer to the first, or bottom image, selecting Edit>Auto-Blend Layers creates masks for each layer and gives you a final image that is sharp from front image to back (#8b). Prior to this feature, I would have gone to an external program such as Helicon Focus.
 |
|
|
|
| |||||||||
- Log in or register to post comments


![]()
Get the Latest Photo Tips, News & Reviews from Shutterbug!
| Camera Reviews Other Reviews | Mobile Reviews Photography Reviews Columns | News | Features | How-To | Resources |
 © 2024 Shutterbug
AVTech Media Americas Inc., USA
All rights reserved